An Introduction to Pyro Staining Developers,
With Special Attention to the Pyrocat-HD Formula
by Sandy King
Pyrocat-HD is one of several Pyro staining developers, including ABC Pyro, Rollo Pyro, PMK, and WD2D+. The use of Pyro developers is a subject that seems to drive photographers into opposite camps. On the one hand users find all manner of extraordinary, even magical qualities in these developers, touting such benefits as stronger edge effects, increased separation of highlight detail, better shadow separation, higher image resolution and finer grain structure than is possible with conventional developers. Others insist that conventional developers are capable of comparable results.
In this article I will review the historical use of Pyro developers, compare several of the Pyro developers in common use today, and provide detailed instructions on mixing and use of the Pyrocat-HD formula, in my opinion the cleanest working and most consistent of all staining developers.
HISTORICAL USE OF PYRO
All contemporary staining developers are based on either Pyrogallol or Pyrocatechin (Pyrocatechol) as the primary reducing agent. Pyrogallol has been used as a developer of silver photographic plates longer than any other organic developer. Introduced by Regnault in 1851, it was first utilized in photography by Frederick Scott Archer in the same year to develop his new invention, collodion-wet plates. It became far and away the most popular developer of the 19th century and was the developer used by all of the major wet plate photographers of the American West, including William Henry Jackson, T. H. O’Sullivan and Carlton E. Watkins, all of whom worked in plate sizes from 11×14 up 18×22 inches.
Pyrocatechin, also called Pyrocatechol, or sometimes just Catechol, was introduced in 1880 but has not been as widely used in the United States as Pyrogallol in spite of the fact that it is considered to be more stable and reliable.
After about 1910 Pyrogallol lost popularity and was largely replaced by other developing substances. Pyrogallol was widely perceived as a developer that gave “a cleaner cut and more definite separation of tones than any other developer,”1 and at the same time was considered one of the most flexible of all agents, capable of giving negatives with strong contrast in concentrated solutions, and soft, delicate results in more dilute solutions. However, Pyrogallol has a number of negative features that led to its loss of popularity. It is stable only in an acid solution and, when mixed in formulations having high sulfite and/or high carbonate, deteriorates rapidly. In all formulations the working solution oxidizes readily and its useful life is short, a feature that can lead to high general stain from aerial oxidation. More importantly, the intensity of the stain image, which is affected by type and intensity of agitation, amount of preservative in the developer, and quantity of developer used in proportion to a given surface area of film, can be difficult to control. Finally, when Pyro is the only developing substance in the formula, there is a considerable loss of film speed. In the days when film development was done in a much less scientific manner than today it was difficult, if not impossible, to control all these factors and achieve consistent results with Pyro. The use of non-staining formulas obviated some of the problems introduced by inconsistent staining but with the loss of the stain, the feature primarily responsible for Pyro’s unique printing qualities.
THE USE OF STAINING DEVELOPERS IN THE CONTEMPORARY PERIOD
For several decades the use of Pyro was carried on primarily with the classic formula known as ABC Pyro. The ABC formula was used by a number of West Coast photographers, including Edward Weston and Morley Baer, and is still promoted today by Michael Smith for contact printing with AZO. It is said to be the most difficult and fickle of all pyro formulas but capable of excellent results “unequaled by even most other pyro formulas, in tonal gradation and subtle highlight separation.”2
The first Pyro developer formulated for modern film, John Wimberley’s WD2D formula, was introduced in 1977 in Peterson’s Photographic. Wimberley’s formula, which uses Metol in combination with Pyrogallol, does not result in a loss of film speed and prints with much less apparent grain than older formulas such as ABC Pyro. It is still used today by many photographers and is available through Photographer’s Formulary in a revised version known as WD2D+.
Much of the current interest in the use of Pyro is due to Gordon Hutchings’ PMK formula, first introduced to the public in a long article in View Camera in September/October 1991 and since promoted in The Book of Pyro, first published in late 1991. Hutchings describes PMK as a universal developer for modern film emulsions used under diverse conditions, easy to use, and designed to achieve maximum image stain and minimum general stain. During development in PMK a yellowish-green image stain is produced in those areas of the negative where silver is being reduced, and this stain is proportional to the amount of silver: least in the shadows where there are areas of low silver density, greatest in the highlights. Since the exposing light sees the stain as increased printing density, total negative density is equal to the combined silver and stain densities. The result is that the stain masks film grain by filling in between silver grains, resulting in both increased acutance and finer tonality in the final print. This effect is seen in negatives of all sizes but the impact is particularly dramatic in 35mm and roll film formats. Steve Simmons describes this effect as follows: “In other words, there is no general overall stain that would act like fog, but a stain that acts like extra density and this stain increases as it goes up the tonal scale. Consequently, the film’s high value silver densities are thinner than with a conventional developer, and the extra density needed to produce the high value tones is created by stain. These ‘thinner’ high value densities in the negative can produce wonderfully clear delicate high values in the print, unlike any tone that can be produced by a non pyro film developer.”3
In recent years three more staining developers have been introduced: Rollo Pyro/ABC+, Diaxactol, and Pyrocat-HD. Rollo Pyro was introduced in 1997 by Harald Leban as ABC+ but is marketed today by Photographer’s Formulary as Rollo Pyro. Rollo Pyro is a very energetic developer that reduces developing times to approximately one-half of those required for PMK. It works well with rotary processing, producing low general stain while yielding film speeds similar to PMK.
Diaxactol is a Pyrocatechin based developer developed by Barry Thornton and marketed as a proprietary formula by Photographer’s Formulary. It is used primarily as a two-solution developer.
Pyrocat-HD was developed by the author and introduced in 1999 in an article published in Post-Factory Photography. A revised formula has been available in the on-line journal Unblinking Eye since 2000 and the developer is also available as a kit from Photographer’s Formulary in the United States and from Lotus Camera in Europe. Pyrocat-HD, like Diaxactol, is based on Pyrocatechin but also contains a small amount of Phenidone that is strongly super additive with Pyrocatechin.
THE ADVANTAGES OF STAINING DEVELOPERS:
SOME ASSUMPTIONS AND SOME FACTS
The claims made by proponents of staining developers are based on both empirical studies and theoretical conclusions. The most important ones are as follows:
1. Since the amount of image stain is proportional to silver density, the stain masks silver grain, thus improving image tonality and reducing grain effect, particularly noticeable in the highlights.
2. Highlight separation, sharpness and acutance are increased because Pyro gives more pronounced edge effects than other developers. This is due to the fact that there is very little migration of silver halide during development, resulting in a more precise reduction, which enhances sharpness, and because Pyro tans and hardens the gelatin during development, thereby reducing the effects of irradiation (scattering of light in the film emulsion) and infectious development (spreading of silver development beyond the exact image boundaries).
3. When printing with variable contrast papers, pyro stain, which is always proportional to silver density, functions as a continuous variable color mask that reduces printing contrast, particularly in the high values. This allows shadow and mid-tones to be printed without compressing or blocking the highlights, reducing time spent burning and dodging.
4. Pyro staining developers are ideal for photographers who want to make dual-purpose negatives, that is, negatives that print well with both silver papers and with alternative processes such as platinum or palladium. This is not possible with traditional developers because Pt/Pd requires negatives of much greater density range than silver papers. However, a stained negative has in essence two printing density ranges, one for the bluish/green light used in printing silver papers, and another for the UV light used with alternative processes. When printing in silver with variable contrast papers the stain, which is greatest in the highlights, compresses the tones and functions as a continuously variable filter, making possible a large range of contrast possibilities. On the other hand, with alternative processes the stain acts as a highly efficient actinic filter of UV light, increasing exposure times by as much as 1 full stop, and upping contrast by adding about log 0.30 density, or more, to the top of the curve. The result is that a stained negative will print under UV light with a much higher effective density range than with silver. This fact has been known for a long time, as we can see in the The Daybooks of Edward Weston from his stay in Mexico, where he writes that he expects to be able to print his pyro negatives in either platinum or silver.4 A recent article by Bob Herbst in View Camera provides a sound sensitomeric base for understanding this phenomenon with more precision.5
THE NEGATIVE SIDE OF PYRO DEVELOPERS
Staining developers have not been universally accepted by the photographic community for several reasons: 1) Pyrogallol is a very toxic chemical, 2) the practice of sensitometry with stained negatives is more complicated than with conventionally processed negatives, and 3) many photographers simply reject the notion that Pyro processed negatives are different from others. We will now examine in detail each of these objections to Pyrocatechin and Pyrogallol staining developers.
Toxicity
Both Pyrogallol and Pyrocatechin are very toxic chemicals. However, the primary danger to photographers is dermal absorption and breathing the dry powder, both of which are easily avoided. Always use rubber gloves when processing sheet film in trays, and either go outdoors or use a vent hood to mix Pyrogallol or Pyrocatechin into solution. By following these simple procedures, and exercising common sense, the potential health risks associated with using these chemicals for developing film are virtually eliminated.
Staining Developers and Sensitometry
The transmission densities of stained negatives, which consist of silver density plus stain, are more complicated to interpret than conventionally processed negatives. Visually, a Pyro negative may look somewhat flat, but looks are deceiving because pyro stain increases the effective printing density range of the negative by as much as log 0.30 to 0.50. Unfortunately the stain cannot be read by densitometers that measure only white light. To accurately measure stain density requires a color densitometer set to the blue channel if printing with silver papers, or a densitometer capable of reading UV densities if printing with any of the alternative processes. Some black and white densitometers may read the stain density for silver printing when fitted with an appropriate blue-violet absorbing filter such as the Schott BG-28 or a 47 or 47B. In using a densitometer with stained negatives for printing with silver gelatin papers, it must be kept in mind that a reading through the blue channel will give only an approximate indication of the effective printing density of the negative. This is due to the fact that silver gelatin papers, though primarily sensitive to blue light, also have considerable sensitivity to UV, violet and green light that a densitometer, which reads only a narrow band of blue, cannot measure. The problem is more acute with variable contrast papers which have, in addition to a high-contrast blue sensitive emulsion layer, a low-contrast green sensitive layer.
The situation is much better with alternative processes which have most of their sensitivity in the UV range. In practice, it will be found that a densitometer reading in UV mode will provide a very accurate indicator of the actual printing density of a stained negative, regardless of the specific color of the stain.
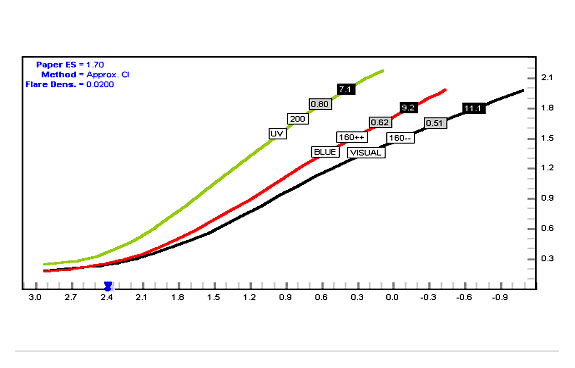
Figure 1. A J and C 200 negative developed in Pyrocat 2:2:100
Figure 1 shows a number of important things about a Pyro stained negative. All three curves are from the same negative. First, note the difference in contrast between the three curves. The black curve is based on a densitometer reading in the Visual (white light) channel and thus represents only silver density. The red curve is based on a Blue channel reading, and includes silver plus stain density as it would be seen by silver papers. The green curve is based on a UV reading and the total density is that of silver plus stain as it would be seen by UV processes. Note how the stain is proportional to silver density, least in the shadow areas of the negative, greatest in the highlights.
DO PYRO NEGATIVES REALLY PRINT DIFFERENTLY?
Many photographers consider the advantages cited by advocates of Pyro developers (edge effects, internal acutance, increased highlight separation) as subjective and unproven, and argue that if a curve of a stained negative looks much the same as that of a conventionally processed negative the result in the print can not be different. On this subject the experts simply disagree. Phil Davis, author of numerous books and articles on the technical aspects of photography, was asked by Steve Simmons in an interview in View Camera, “Would you say that, if it were possible, to create the same curve with a specific film and a non-PMK developer and the same film developed in PMK that the prints would be identical to the eye?” Davis responded, “To answer you question as objectively as possible, I’ll say that if it were possible to produce identical film curves with PMK and some other developer on the same film, and if the prints were matched at two or more density levels, and if the tests were conducted with a panel of unbiased viewers under totally “blind” conditions, I suspect that the prints would be judged to be indistinguishable.”6 Responding to the same question, Gordon Hutchings, who developed and popularized the PMK formula, disagreed with Davis, with these comments “Would two prints from identical gamma pyro and non-pyro negatives look the same in the prints? Absolutely not. If there was no difference in developers we would never have needed but one.”7
Do prints made from Pyro negatives have a different look than those made from other negatives? I believe that most Pyro users would respond yes to this question. It seems clear that for some reason, be it edge effect, highlight separation, increased internal acutance, or simply the “mystery of Pyro” as some might claim, the experience and observations of large numbers of photographers is that there is something unique and interesting about the printing qualities of Pyro negatives. In my own work I have found Pyro developers to be an extremely useful tool. I warn, however, that the use of Pyro developers is incompatible with sloppy technique and that photographers who are by nature careless in the darkroom and place little value on refined technique should not consider using Pyro. However, those who approach the use of Pyro with care and skill and are capable of refining their technique to standardize operating procedures can expect to achieve consistent and repeatable results that offer the possibility of greatly expanding the expressive quality of their work.
PYROCAT-HD
In early spring of 1998 I became interested in finding a staining developer which could work well in a variety of applications: rotary processing in Jobo, print drums, or BTZS tubes; in trays with intermittent agitation; and in tanks with minimal or semi-stand agitation. My experiments with Pyrogallol formulas were quite unsuccessful because rotary processing often led to high fog levels and uneven staining, while reduced agitation led to streaking and mottling. Then I turned to Pyrocatechin for my experiments. As Anchell and Troop observe in The Film Developing Cookbook, Pyrocatechin stains and tans as well Pyrogallol and is “generally considered to be more stable and reliable.”8 In addition Pyrocatechin is much less sensitive to aerial oxidation than Pyrogallol. Unfortunately none of the previous formulas using Pyrocatechin have been as successful as some of the Pyrogallol based formulas. Many use Sodium hydroxide as the accelerator and are, as Troop mentions, “too alkaline for modern films, tending to create unnecessary fog.”9 Too much alkalinity also leads to more pronounced grain, which is especially undesirable with 35mm and roll film formats.
After more than a year of experimentation I came up with the Pyrocat-HD formula, first published in Issue # 4 of The World Journal of Post-Factory Photography. I later made some minor modifications to the developer and the formula has been available in its present form at http://www.unblinkingeye.com since the spring of 1999. Pyrocat-HD is currently sold as a kit by Photographer’s Formulary in the US and by Lotus Camera in Europe. The formula is carefully balanced and gives, with proper agitation, negatives of high acutance, a tight grain pattern, and when used with minimal and semi-stand development, enhanced adjacency effects. Pyrocat-HD also gives a slight speed gain with many films (as compared with PMK and Rollo Pyro), especially with the 1:1:100 dilution.
Pyrocat-HD is a Pyrocatechin/Phenidone based developer formula that has some clear advantages over Pyrogallol based developers in rotary processing of sheet film in tubes and drums because it is less likely to cause undesirable stain or uneven development. Many photographers have also found that Pyrocat-HD works well with tray processing, and I know of quite a few who are using it with development by inspection methods, including brush development. Moreover, subsequent tests and experiments with Pyrocat-HD have shown that it is also an excellent developer for use with 35mm and medium format films because of its high acutance and tight grain pattern.
IS PYROCAT-HD BETTER THAN OTHER PYRO DEVELOPERS?
I am not a developer gadfly and my philosophy with films and developers has always been to stay with things that work well. There are several very good staining developers and I have used and tested most of them. I used PMK as my primary developer for almost a decade but when I switched to rotary processing I began to have problems with uneven development, streaking and excessive general stain. I have been using Pyrocat-HD now for about five years and have not seen any of these problems. This fact, and the consistently high quality of my Pyrocat-HD negatives, is convincing proof to me that Pyrocat-HD is the most consistent and trouble-free of all of staining developers. It is characterized by the following attributes.
- Very high acutance and a capability for great apparent sharpness on the print. My tests show that acutance with Pyrocat-HD is superior to other high-acutance developers such as PMK and FX-2.
- Very tight grain pattern, virtually identical to PMK and FX-2, suitable for 35mm and roll film processing as well as sheet films.
- Fast acting. Pyrocat-HD, even at the 1:1:100 dilution, requires shorter development times than both PMK and WD2D to reach an equivalent CI.
- Very clean acting and produces very low levels of general stain, even with long development times. This makes it a very attractive developer for alternative printing processes that require negatives of very high CI.
- Very consistent and does not suffer from uneven staining or streaking. It can be used with rotary processing with absolutely no fear of uneven development, streaking, or staining.
- Can be used with minimal agitation when processing roll film in tanks for very pronounced adjacency effects that can result in great apparent sharpness.
- Pyrocat-HD at the 1:1:100 dilution gives slightly greater effective film speed than other Pyro staining developers when negatives are developed to the same CI.
- Pyrocat-HD is a better developer for making dual-purpose negatives, i.e. as for printing with regular silver papers and with AZO or alternative processes with the same negatives.
- When printing with silver gelatin variable contrast papers Pyrocat-HD renders upper middle tones and highlights with more contrast than pyrogallol-based developers.
- Pyrocat-HD is very inexpensive to use. When mixed from scratch it is much more economical to use than Pyrogallol based developers such as Rollo Pyro, PMK and WD2D.
PYROCAT-HD FORMULA
Pyrocat-HD is mixed as two stock solutions that are diluted to make a working solution for developing. The shelf life of the stock solutions is very good. Stock Solution A can be stored in partially full bottles for up to a year, while Stock Solution B keeps indefinitely.
Pyrocat-HD
Stock Solution A |
|
| Distilled Water | 750 ml |
| Sodioum Metabisulfite | 10 g |
| Pyrocatechin | 50 g |
| Phenidone* | 2 g |
| Potassium Bromide | 1 g |
| Distilled water to make | 1000 ml |
Stock Solution B |
|
| Distilled Water | 700 ml |
| Potassium Carbonate | 750 g |
| Distilled water to make | 1000 ml |
| To make a standard working solution mix 1 part A with 1 part B with 100 parts water.
*Or substitute 25 grams of metol (with slight lose in film speed) |
MIXING THE STOCK SOLUTIONS
Stock Solution A
1. Start with 750ml of distilled water.
2. Add 10g of sodium metabisulfite and stir until dissolved.
3. Add 50g of Pyrocatechin and stir until dissolved.
4. Mix 2.0g of Phenidone with about 5ml of isoprophyl alcohol and stir into an even paste, then add to the stock solution and stir until dissolved.
5. Add 1.0g of potassium bromide and stir until dissolved.
6. Add distilled water to 1000ml.
Stock Solution B
1. Start with 700ml of distilled water.
2. Weigh out 750g of potassium carbonate* and add the chemical very slowly to the water, with constant and rapid stirring. If you add the solution too fast, or don’t stir enough, it will be impossible to dissolve all of it in the water. As you add the chemical an exothermic reaction takes place and the solution will warm up appreciably.
3. Add distilled water to 1000ml.
* Potassium carbonate is deliquescent, which means that it will absorb water from the air. It must be stored in sealed containers to prevent this from happening because if you weigh out 100g of potassium carbonate that has absorbed a lot of water the actual chemical weight might be only 60-80g, which of course would produce a much weaker B solution than the formula requires.
WORKING SOLUTIONS OF PYROCAT-HD
For developing negatives intended for printing with silver gelatin papers the recommended working solution is a 1:1:100 dilution.
One Part Stock Solution A + One Part Sock Solution B + 100 parts water.
For printing with AZO and most alternative processes, including carbon, kallitype, Pt/Pd, Vandyke, POP, albumen, and salted paper, a 2:2:100 solution is recommended.
Two Parts Stock Solution A + Two Parts Stock Solution B + 100 Parts water.
In most localities it is safe to mix the working solutions with tap water. However, if you see any unusual development artifacts such as sledging, streak marks, or uneven staining, the use of distilled water is recommended.
VARIATIONS ON THE FORMULA
1. Metol can be substituted for Phenidone in the Pyrocat-HD formula at the rate of about 10 parts Metol to one part Phenidone. The substitution does not affect stain intensity or acutance but it may result in a slight loss in effective film speed. Note that the development times in this article are based on the Phenidone version of Pyrocat-HD and if you choose to substitute Metol these times may require adjustment.
2. Sodium carbonate can be substituted for potassium carbonate in the Pyrocat-HD formula. The two carbonates give virtually identical results when used at equivalent chemical weight in the working solution. However, sodium carbonate is much less soluble than potassium carbonate so it must be mixed as a weaker stock solution. To prepare a Stock Solution B with sodium carbonate, add 200g of sodium carbonate to 1000ml of water. To make a working solution for silver printing that would be exactly equivalent to the regular 1:1:100 dilution when using potassium carbonate, mix One Part A + Five Parts B + 94 parts Water. For alternative printing the working solution should be mixed 2:10:92 to exactly match the 2:2:100 dilution with potassium carbonate. For all practical purposes you could just mix the working solutions with sodium carbonate at 1:5:100 or 2:10:100 and make minor adjustments to development times as required.
3. Some people are using Pyrocat-HD with a 10% Sodium hydroxide Stock B solution in place of the carbonate. This appears to work fine but the increased alkalinity may give slightly increased grain with some films so test carefully before making this substitution. To make a working solution using 10% sodium hydroxide as Stock B dilute 1 Part Stock A + 1.5 Parts Stock B + 100 Parts Water. This working solution will give similar results to the regular 2:2:100 dilution using potassium carbonate. However, because of the possibility of increased grain size I only recommend the substitution of sodium hydroxide for developing negatives meant for contact printing.
GENERAL DEVELOPMENT PROCEDURES
1. Pre-soak for five minutes. The pre-soak is optional with tray and tank development (except with minimal and stand development), but it is absolutely essential with rotary processing.
2. Development for the time required in tubes, drum, tray or tank according to the instructions that follow.
3. Stop bath. I recommend the use of a dilute acetic acid bath of about 1/4 to 1/2 normal strength. If the stop bath is too strong it will reduce image stain.
4. The use of an alkaline fixer is recommended. Kodak and Ilford Rapid-Fix work fine, as does Formulary TF-4. I use the TF-3 formula described in Anchell and Troop’s The Film Developing Cookbook.
5. One minute in a hypo-clearing agent. I use a 1% solution of sodium sulfite but any of the commercial products will serve the same purpose.
6. Wash in running water for 30 minutes.
Do not use an alkaline after-bath after fixing as recommended by Hutchings for PMK. My tests show that the stain added by this after-bath is primarily b+f, or general stain. General stain increases printing times and does nothing to enhance the printing qualities of your negatives.
Pyrocat-HD is capable of outstanding results with many different kinds of development methods. Some specific operating procedures for the various methods are provided at this point.
DEVELOPMENT OF SHEET FILM IN TRAYS
Because of its high resistance to aerial fog Pyrocat-HD is an excellent developer for tray development. Negatives developed in trays, even with long development times, will have very little general stain. This is due to the fact that Pyrocat-HD, unlike pyrogallol-based developers, is not very sensitive to aerial oxidation, considered to be the major cause of general staining. To avoid the possibility of scratching I recommend development of only one sheet of film per tray, but persons experienced with shuffle development procedures should feel free to develop this way. For even development use a tray at least one size larger than the film being developed: 8X10 trays for 5×7 negatives, 11×14 trays for 8×10 negatives, etc. This will reduce the possibility of uneven development at the edges caused by local hot areas that result from the increased speed of the developer as it bounces off the edge of the tray during agitation.
Always wear protective gloves with tray development to avoid skin contact. Although there is no history of long-term health problems from the use of Pyrocatechin as there is with Pyrogallol it should nevertheless be treated with the same level of care since it is also a toxic chemical.
Pyrocat-HD can also be used to develop film by inspection. As is the case with other Pyro developers the staining/tanning action also serves to desensitize film. There has been quite a bit of discussion regarding the use of Pyrocat-HD in this type of application on the AZO forum at Michael Smith and Paula Chamlee’s website. One of the conclusions that emerged from the discussions at this site was that when Pyrocat-HD is developed by inspection the use of an amber rather than green safelight makes it easier to see the degree of development. This is because the brown stain of Pyrocat-HD blocks green light and makes it difficult to evaluate the negative by transmitted light when using a green safelight. However, if you evaluate the negative density by reflected light either a green or amber filter work fine.
Another development method that has been used successfully with Pyrocat-HD is brush development by inspection. Use a dim green or amber safelight for inspection. Jorge Gasteazoro, a pt/pd printer from Mexico who uses this method of development, provides the following instructions.
1. Pre-soak the film for one minute.
2. Pour the developer on the film and immediately begin brushing with a wide Hake brush or some another type of fine bristle brush. Brush from top to bottom with light strokes, then from side to side. Then repeat the sequence. To keep the film from moving hold down one of the corners with your fingers.
3. After about 70% of anticipated development time has expired, turn on the safelight, lift the negative from the tray and evaluate the degree of development by transmitted light.
4. Continue the above procedure until the negative has reached the necessary density, then transfer it to a stop bath and proceed as with other methods of development.
ROTARY DEVELOPMENT OF SHEET AND ROLL FILM
I developed the Pyrocat-HD formula primarily to eliminate problems I had experienced with other staining developers using rotary processing. By rotary processing I mean development of film in Jobo, in BTZS type tubes, or in print drums used on motor bases. I used PMK for many years with tray processing and was very pleased with the results. However, when I switched to rotary processing I began to experience a number of development problems, including high general stain, streaking on the emulsion side of the film, and unusual pressure marks on the base side of the emulsion that resulted from contact with the surface of the tube or from the ribs. Sometimes the streaks and pressure marks would not be visible when looking at the negative through visual light, but they would show up later during printing with UV light. I switched to Rollo Pyro, and while this reduced the high general stain it did not solve the problem of streaking and pressure marks. The use of Pyrocat-HD has eliminated all these problems in my own work and I strongly believe it is by far the best Pyro developer for use with rotary methods of development.
One of the big advantages of Pyrocatechin is that it does not oxidize as rapidly in alkaline solutions as Pyrogallol. However, with very active agitation, as in Jobo at maximum speed, Pyrocat-HD does indeed oxidize. For this reason I recommend very slow rotation to minimize oxidation when developing film in Jobo processors.
My recommended procedures for rotary processing are straightforward and conventional.
1. Start by loading the film into the tubes or drum. With some drums and tubes it may be necessary to load the film wet to make sure there is a transfer of chemicals on the base of the film.
2. Pre-soak the film for five minutes. Distilled water is recommended.
3. Discard the pre-soak water and pour the developer into the drum or tubes and begin development. I recommend a minimum of 50ml of the 1:1:100 dilution per 4X5″ sheet of film (20 square inches). This amounts to about 90ml for 5X7, 200ml for 8X10, 385ml for 11X14, 300ml for 7X17, 600ml for 12X20, and 1200ml for 20X24. Remember, these are minimum amounts. With the 2:2:100 dilution the amounts can be reduced by about 20%.
4. Adjust your procedure as follows depending on whether you are using Jobo, BTZS type tubes, or print drums on a motor base.
Jobo — Rotation speed should be at the slowest setting available. This is very important because fast rotation will result in a large increase in general or b+f stain. If it is not possible to slow down the rate of rotation there are other options that will also reduce the amount of general stain. The degree of oxidation that can take place in an alkaline Pyro developer is controlled by the amount of sodium sulfite preservative in the working solution. With most forms of development Pyrocat-HD needs very little sulfite to prevent excess general stain and it is provided by the small amount of sodium bisuilfite in the A solution, which serves two roles: 1) the sodium bisulfite acts as a preservative in the stock solution, and 2) when it mixes with the potassium carbonate alkali it forms sulfite through reaction. However, when we develop film with rotary processing at high rotation rates the amount of sulfite is insufficient and general stain can result.. To counter this I recommend one of the following solutions: add 30% more of stock solution A when making up the working solution, or (but not also) add about 0.3 g/L of sodium sulfite to each liter of working solution. Both solutions have the practical effect of bumping the amount of sodium sulfite preservative in the working solution and this will slow down the rate of oxidation.
BTZS type tubes — Develop by allowing the tubes to randomly bob about in a water bath, spinning each gently every few seconds. Do not agitate too vigorously.
Print drums on motor base — Remove the drum every minute or so and give it vigorous sideways agitation. This will break up any laminar flow patterns created by the one-plane rotation of the motor base and prevent bromide drag.
.
DEVELOPMENT OF FILM IN TANKS
Pyrocat-HD can be used to develop 35mm, roll film, and sheet film in tanks following conventional procedures with no special precautions. Vigorous agitation is not needed with Pyrocat-HD as it is with pyrogallol-based developers, and with most films minimal agitation procedures can be used successfully. Stand agitation can also be used with some films. Slight modifications are necessary, however, depending on which of the three methods is used.
Normal Agitation — Normal agitation for tank development is considered to be continuous agitation for the first 60 seconds of development, then agitation for 5-10 seconds every 30-60 seconds thereafter. With this pattern of agitation Pyrocat-HD can be used with no modification to your normal development procedures for conventional developers.
Minimal Agitation — Minimal agitation consists of continuous agitation for the first 60 seconds of development, followed by 10 seconds of agitation every third minute. With this method a pre-soak of five minutes is strongly recommended to avoid the possible formation of bubbles on the emulsion. Minimal agitation has three desirable results: 1) it gives great apparent sharpness through the formation of maximum adjacency effects, 2) it provides a compensating effect, and 3) it provides increased emulsion speed.
With minimal agitation you should extend development time about 50% over the normal time required for intermittent agitation, but experiment before risking valuable negatives.
Stand Development — Stand development is a highly specialized type of development that makes use of extremely dilute developers in conjunction with very long development times. It has as its purpose the creation of extreme adjacency effects and maximum apparent sharpness. It also gives maximum emulsion speed and provides great compensating effect. When it works, the results can be extraordinary, even stunning. Unfortunately this method of development is fraught with dangers and in practice it will be found that some films, especially high-speed films, are poor candidates for this type of development. And even when the procedure works well for a particular roll of film there will often be one or more frames that are ruined because of an air-bubble, bromide drag, or one of a number of other development artifacts that can plague this method of development. For this reason it is essential to test your film thoroughly, and to always make two or more back-up shots of important scenes when using stand development.
With stand development you should always pre-soak the film for about five minutes to eliminate the formation of air-bubbles. Should an air-bubble form on the film during stand development the negative will be ruined because the bubble will prevent any exchange of developer at that spot, and the effect will be to spread irregular circular patterns of up to 1/4″ to 3/8 “in diameter around the bubble, ruining the frame or sheet of film.
The working Pyrocat-HD solution should be mixed at approximately 2:2:400-500, i.e. two parts A + two parts B + 400-500 parts of water for stand development. To begin development discard the pre-soak water, pour in the developer, and agitate continuously and vigorously for 60 seconds. Then, set the tank aside and leave it with no further agitation for the remainder of the development period. Development times for most films will be in the 45-60 minutes range.
MUCH MORE ABOUT STAIN
There are several aspects of stain that need to be considered. They are: 1) intensity and color of the stain, 2) whether the stain is proportional image stain or general b+f (base plus fog) stain, and how this can be controlled, and 3) what are the differences, if any, between Pyrocat-HD stain and the stain produced by other Pyro developers.
INTENSITY AND COLOR OF THE PYROCAT-HD STAIN
The stain produced by Pyrocat-HD is typically brown, or even brownish-black. Photographers who have previously used developers like PMK and Rollo Pyro nearly always underestimate the intensity of the Pyrocat-HD stain because by comparison with the green or greenish/yellow stain of these developers the brown Pyrocat-HD stain looks almost neutral in color. This is not the case, however, and in practice it will be found that the brown stain of a Pyrocat-HD negative will have an impact on the effective printing density of the negative that is as great or greater than the green and greenish/yellow stain of other Pyro developers.
When printing with graded silver papers it will be found that the brown stain of Pyrocat-HD filters out more of the blue and blue-green light to which silver papers are sensitive than does the green stain of PMK and Rollo Pyro, the practical consequence of which is a boost in contrast. And this is even more true when printing with alternative processes based on exposure to UV light because brown is a much more highly actinic filter for UV light than green.
There appears to be a universal acceptance in some quarters that certain films work better with Pyro developers than others because they stain better. Gordon Hutchings, who developed the PMK formula, promotes this point of view, as do many other PMK users. My own testing, however, does not support this conclusion. What I have found is that with proportional image stain the amount of stain is much more dependent on the overall density of the negative than on film type. What I conclude from this is that proportional stain is a stain that exists primarily around silver grains and staining developers work about equally well with all films, since all films contain silver in sufficient quantity to develop high density levels, even without staining. That some films appear to work better than others is due to fact that the gelatin base of some films is thicker and these films develop more general stain for the simple reason that there is more gelatin to stain. And this is far from desirable, as we shall discuss in the next section.
DIFFERENCE BETWEEN IMAGE STAIN AND GENERAL
At the outset it is important to understand that there are really two kinds of stain: image stain, and general or b+f (base plus fog) stain. Image stain is a proportional stain that is formed directly around silver grains. It is desirable stain because it can greatly increase the micro-contrast of the negative and boost overall printing contrast, which can be very useful with alternative printing processes that require negatives of high-density range. General stain, on the other hand, affects the entire gelatin layer, regardless of whether there is silver density present or not. It is present everywhere on the film in equal amounts, and for that reason results in unnecessary fog. You can easily spot it by looking at the clear area of the film. When film is developed in a Pyro developer the general stain should be only slightly greater than when it is developed in a traditional non-staining developer. If there is a lot of stain in the clear areas of the film it is almost surely general stain. General stain serves no useful function: it increases printing exposure times, and under certain conditions is harmful to image quality because it can limit the useful CI (contrast index) of films.
General stain is much less of a problem with Pyrocat-HD than with Pyrogallol based developers such as PMK, ABC Pyro and Rollo Pyro. This is due to the fact that pyrocatechin, the primary reducing agent in Pyrocat-HD, does not oxidize as rapidly in alkaline solutions as pyrogallol. And of course the main cause of excessive general stain is aerial oxidation.
No special precaution is necessary with Pyrocat-HD to prevent general stain from aerial oxidation when developing film in trays or in tanks, and this is true even when films are subjected to long development times needed to reach the high CI necessary for printing with alternative processes. However, as mentioned earlier, one should avoid using very fast rotation with rotary processing, especially with thick emulsion films such as Bergger BPF, Kodak TRI-X, and Ilford HP5+.
STAIN WITH PYROCAT-HD AND OTHER PYRO DEVELOPERS
In comparing the effect of the stain of Pyrocat-HD to that of other developers it is important that we distinguish between the various kinds of processes being used. As we have already observed, the color of the Pyrocat-HD stain is different from that of other Pyro staining developers. And, since different kinds of papers and processes have a different spectral response to light it follows that there will be some differences in printing depending on the color of the stain.
Most persons working with Pyro staining developers are printing with one of the following processes.
1. Graded Silver Gelatin Papers
2. Variable Contrast Silver Gelatin Papers
3. AZO
4. Alternative processes that need high levels of UV light for exposure.
Let us consider the impact of different stains for each of these processes.
GRADED SILVER GELATIN PAPES
Graded silver papers consist of one layer of emulsion on a paper or RC base. The range of sensitivity for graded papers begins with UV and extends through the visible range of violet, blue, and slightly into the green. Generally, we use a UV filter when printing to eliminate UV light from the equation. Graded papers are most sensitive to blue light and as a general rule the blue channel of a color densitometer will provide a fairly accurate indication of the actual printing contrast, or exposure scale, of the paper. In theory this means that the function of the stain with graded silver papers is to boost contrast so that there is little difference or advantage derived from the color of the stain.
In practice, however, it will be found that the brown stain of Pyrocat-Hd will print with slightly more contrast than the green stain of other Pyro staining developers. This is due to the fact that graded papers have some sensitivity to green light, and brown stain blocks green light more efficiently than green stain.
VARIABLE CONTRAST SILVER GELATIN PAPERS
Variable contrast silver papers have two emulsion layers: a blue sensitive high-contrast layer, and a green sensitive low-contrast layer. With these papers the color of the stain is very important and in practice one will get quite different results when printing with brown stained and green stained negatives.
When printing VC papers with green stained negatives it will be found that the green stain acts as a continuously variable contrast filter that has as its practical consequence the ability to hold highlight values extremely well. The filter is variable because of the proportional nature of the stain, which is of course greatest in the highlights where there is a lot of silver density. The negative side of this coin is that extending the luminance range comes at the cost of a loss of contrast in these values. In other words, the higher the luminance values the more shouldering you will see in the curve of a print made with a green stained negative, and this translates into a flattening, or loss of contrast, in highlight tones. In practice it will be found that the shouldering tendency with green stained negatives actually begins in the upper mid-tones so that one will see some flattening of tones in these areas as well as in the highlights. If you look at the literature you will see that one of the major objections to PMK has been the lack of separation, or contrast, in the upper mid-tones and highlight areas.
Brown stain blocks green light more effectively than green stain, and for that reason there is much less shouldering in the highlights with Pyrocat-HD than with PMK. The result is that prints made with Pyrocat-HD negatives on VC papers will have more contrast in the highlights than prints made with PMK negatives, but there will less compensating effect.
AZO
AZO paper is similar to regular graded papers in that it has a lot of sensitivity to blue light, but different in that it has much less sensitivity to green light. AZO is much slower than other silver gelatin papers and must be contact printed. And, while AZO is available in two grades, even the softest grade has a much longer ES (Exposure Scale) than regular silver papers. This means that you need a negative with a lot of contrast to print with Grade 2 AZO paper. Stained negatives intended for printing with a Grade 2 AZO should have a Visual density reading of approximately log 1.2, which will translate to about log 1.5 with a Blue channel reading.
In practice it will be found that the brown Pyrocat-HD blocks a lot more of the blue and UV light than the greenish stain of other Pyro developers, which means that for a given Visual density reading a Pyrocat-HD negative will print AZO with more contrast than either PMK or Rollo Pyro.
So how does Pyrocat-HD compare to ABC Pyro for printing AZO. Very well indeed, and based on recent exchanges on Michael and Paula’s AZO forum it is clear that quite a number of ABC Pyro users have switched to Pyrocat-HD. I recently made some comparisons of the two developers on the AZO forum, reproduced here in a slightly edited form.
COMPARISON OF ABC PYRO WITH PYROCAT-HD
1. For negatives intended for printing with AZO or an alternative process such as carbon, kallitype, platinum/palladium one should use the 2:2:100 dilution of Pyrocat-HD.
2. ABC Pyro, used at the 1:1:1:7 dilution, is slightly more energetic than Pyrocat-HD at the 2:2:100 dilution. This means that development times with Pyrocat-HD will need to be slightly longer than with ABC Pyro, perhaps about 20-25% or so, to reach the same CI (contrast index).
3. A visual comparison of an ABC Pyro negative and a Pyrocat-HD negative will be misleading because a much higher percentage of the effective printing density of a Pyrocat-HD negative consists of stain density.
4. Pyrocat-HD negatives are much finer grained than those developed in ABC Pyro, making it a more universal developer since it can also be used with roll film as well as sheet film for projection printing without the large grain that is characteristic of ABC Pyro.
5. The uneven development and streaking that many people have experienced with pyrogallol based developers, including both PMK and ABC Pyro, is entirely eliminated with Pyrocat-HD.
6. Pyrocat-HD is a better developer for making dual-purpose negatives for those who are interested in working with both regular silver papers and AZO (or with alternative process such as carbon, platinum/palladium or kallitype). This is because Pyrocat-HD negatives have a much greater difference between the effective printing density for UV light processes and blue sensitive light processes than ABC. This results from the fact that a much higher percentage of the effective printing density of a Pyrocat-HD negative consists of brown stain, which functions as a highly effective filter to UV light.
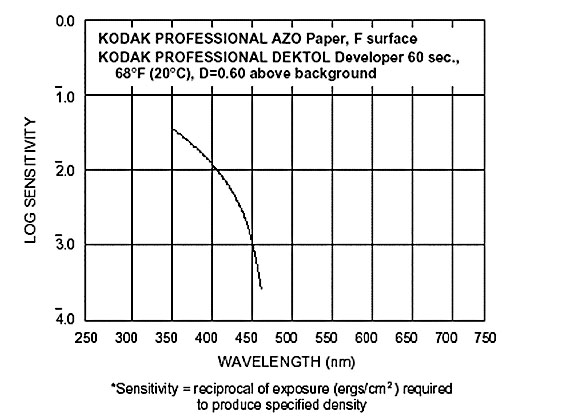
Figure 2. Spectral Sensitivity Chart of AZO Paper, F surface.
ALTERNATIVE PROCESSES
Printing with alternative processes such as albumen, carbon, kallitype, platinum/palladium, salted paper, and vandyke is similar to printing with AZO in that these processes require negatives of high DR (density range), ranging from a low of about log 1.4 with platinum to a high of over log 2.25 with albumen and salted paper. Alternative processes are most sensitive to UV light, and since the stain of Pyro developers functions as a highly actinic filter to UV light it follows that the stain can add a lot of effective printing contrast to a negative. As an actinic filter for UV light the brown stain of Pyrocat-HD is much more efficient than the greenish stain of some of the other staining developers.
I have compared the Visual, Blue and UV curves of Ilford FP4+ with several Pyro developers and have reproduced the curves below. The developers compared were: 1) Pyrocat-HD, 2:2:100, 2) PMK, 1:2:100, 3) Rollo Pyro, 2:4:100, 4) WD2D, 20:20:400, and 5) Pyrocat-HD, 1:1:100
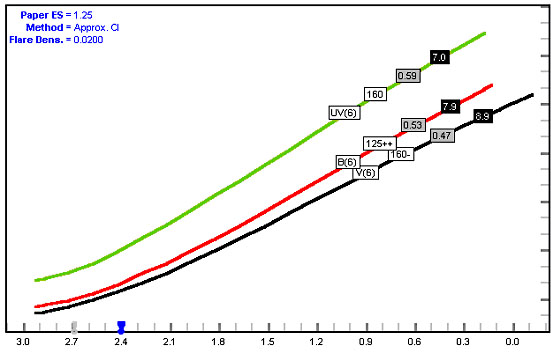
Figure 3. Ilford FP4+ in Pyrocat 2:2:100.
Film developed for six minutes at 70 degree F, in BTZS types tubes. Black curve is Visual Reading, Red Curve is Blue Reading, and Green Curve is UV reading.
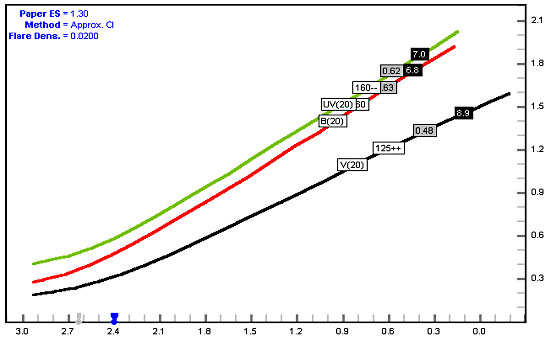
Figure 4. Ilford FP4+ in PMK 1:2:100.
Film developed for 20 minutes at 70 degree F, in BTZS types tubes. Black curve is Visual Reading, Red Curve is Blue Reading, and Green Curve is UV reading.
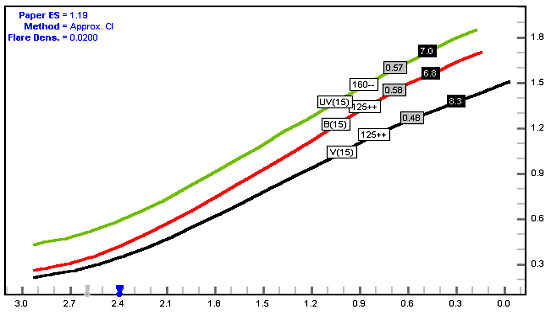
Figure 5. Ilford FP4+ in Wimberley WD2D+, 20:20:400.
Film developed for 15 minutes at 70 degree F, in BTZS types tubes. Black curve is Visual Reading, Red Curve is Blue Reading, and Green Curve is UV reading.
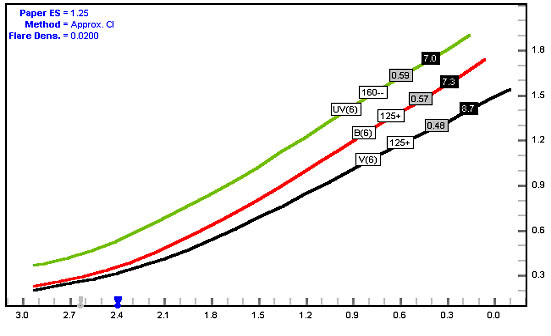
Figure 6. Ilford FP4+ in Rollo Pyro 2:4:100.
Film developed for 6 minutes at 70 degree F, in BTZS types tubes. Black curve is Visual Reading, Red Curve is Blue Reading, and Green Curve is UV reading.
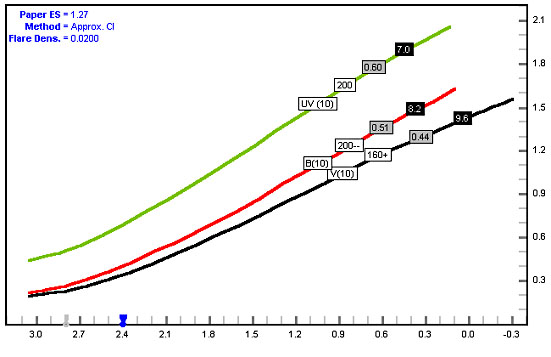
Figure 7. Ilford FP4+ in Pyrocat 1:1:100.
Film developed for 10 minutes at 70 degree F, in BTZS types tubes. Black curve is Visual Reading, Red Curve is Blue Reading, and Green Curve is UV reading.
Development of all of the above negatives was in BTZS type tubes in a water-bath. The CI of all of the curves has been normalized for the UV reading for a SBR of 7, equivalent to N development in Zone speak.
Analysis of the curves reveals some interesting information.
1. The density range that results from developing for a SBR of 7.0 ranges from about log 1.2 to log 1.3.
2. Even for a relatively low DR of 1.2 to 1.3, PMK and WD2D require fairly long development times, 20 minutes and 15 minutes respectively. This fact makes these developers only marginally useful for alternative processes in normal SBR conditions, and quite impractical for use with negatives exposed in scenes requiring N+ development.
3. Pyrocat-HD at the 1:1:100 produces the highest effective film speed with the FP4+ emulsion. At ten minutes of development for a SBR of 7, the effective film speed of FP4+ is EI 200. All of the other combinations produce a maximum EI of 160 with the same parameters.
4. Pyrocat-HD at the 2:2:100 dilution and Rollo Pyro at the 2:4:100 dilution produce almost identical curves in the UV at six minutes of development.
5. The Pyrocat-HD negatives have a greater difference between the UV and Blue reading than the other developers. This is a fact of some consequence because it clearly shows that Pyrocat-HD would make a much better developer for dual-purpose negatives than any of the other developers. That is, a Pyrocat-HD negative that would print well with regular silver gelatin papers (which are most sensitive to blue light), would also print well with an alternative process sensitive to UV light. By contrast the greenish stain of the pyrogallol-based developers is much less effective as an actinic filter to UV light, the result being that the stain adds very little additional effective print density to the negative with UV sensitive processes.
RECOMMENDED DEVELOPMENT TIMES
CI (contrast index) charts are provided below for a number of films that I have personally tested. The charts are very simple to use. To find a development time for a particular film and process just locate the point on the chart where development time (y-axis) intersects with the optimum CI (x-axis) of the printing process. The development times indicated should give negatives that print well with subjects of normal lighting, what we would refer to as N subjects (in Zone terminology) or SBR 7 with incident metering methods. However, it is important to do your own testing with new developers to determine what development times are needed for other than normal lighting conditions before processing important negatives.
Below are the approximate CI values needed for a number of alternative processes. Most processes have means to control contrast but it is good practice to always start with the best negative possible for the process.
| Process | Optimum CI |
| Silver Gelatin | 0.47 to 0.52 |
| Carbon | 0.65 to 0.75 |
| Platinum | 0.68 to 0.72 |
| Azo | 0.70 to 0.75 |
| Kallitype & Palladium | 0.80 to 0.85 |
| Vandyke | 0.85 to 0.95 |
| Albumen & Salted Paper | 0.90 to 1.00 |
The CI charts below are based on rotary processing in BTZS type tubes, with a pre-soak of five minutes. The time and temperature of development is noted on each chart. The charts that have violet caption and end with the word UV are intended for printing with alternative processes that use UV light for exposure. These charts were created based on a UV reading of the negatives. Charts that have blue caption and that end with the word Blue are intended for printing with silver gelatin processes, including AZO. These charts were created based on a Blue channel reading of negative densities.
Photographers who have established reliable development times for specific films with PMK or Rollo Pyro can use these times as guides for initial testing with Pyrocat-HD. For printing with silver gelatin and variable contrast papers development times for Pyrocat-HD, 1:1:100 dilution, are only about 70% of PMK times, and only 50% of PMK times if developing for a UV sensitive alternative process. When using the 2:2:100 dilution of Pyrocat-HD development times are virtually identical to those of Rollo Pyro at a dilution of 2:4:100.
Figure 8. Ilford FP4+ in Pyrocat-HD, 2:2:100. UV
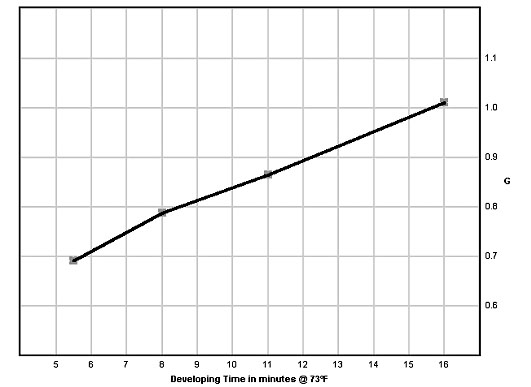
Figure 9. Acros in Pyrocat-HD, 2:2:100. UV
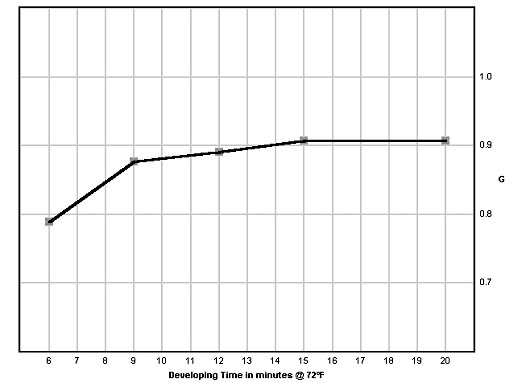
Figure 10. Bergger BPF 200 in Pyrocat-HD, 2:2:100. UV
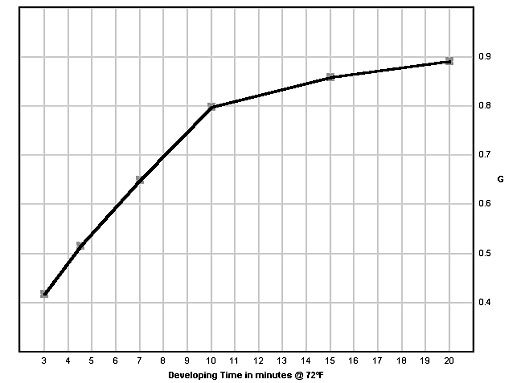
Figure 11. FortePan 400 in Pyrocat-HD, 2:2:100. UV
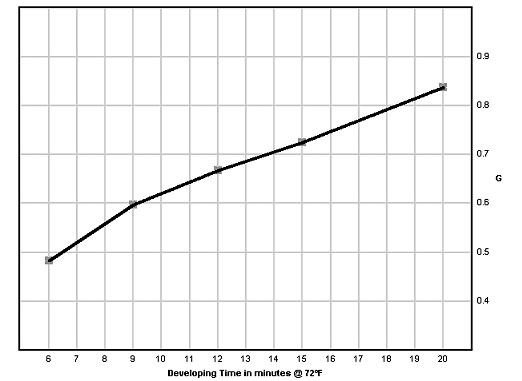
Figure 12. HP5+ in Pyrocat-HD, 2:2:100. UV
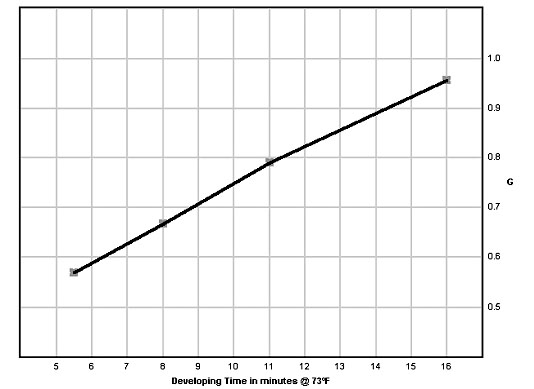
Figure 13. TMAX-400 in Pyrocat-HD, 2:2:100. UV

Figure 14. JandC Classic 400 in Pyrocat-HD, 2:2:100. UV
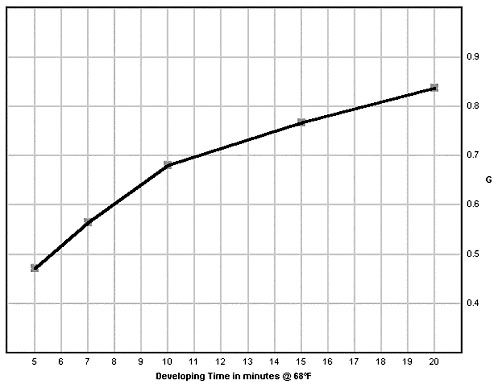
Figure 15. Ilford FP4 in Pyrocat-HD, 1:1:100. UV
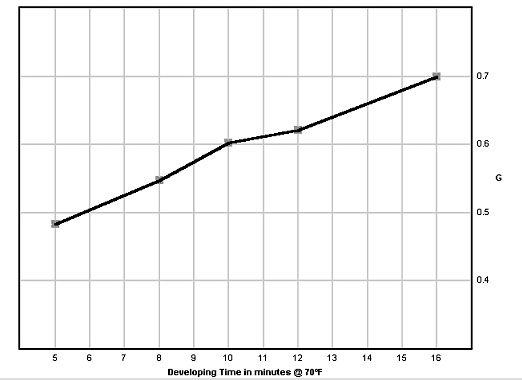
Figure 16. Ilford FP4+ in Pyrocat-HD, 1:1:100. BLUE
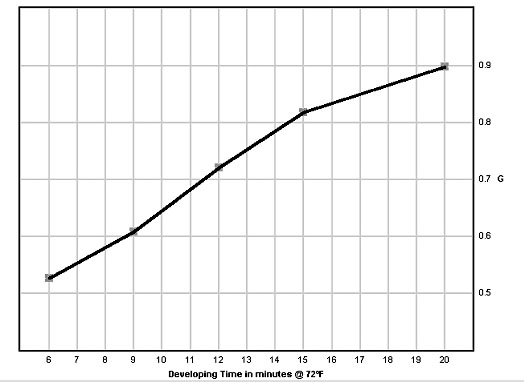
Figure 17. Bergger BPF 200 in Pyrocat-HD, 2:2:100. BLUE
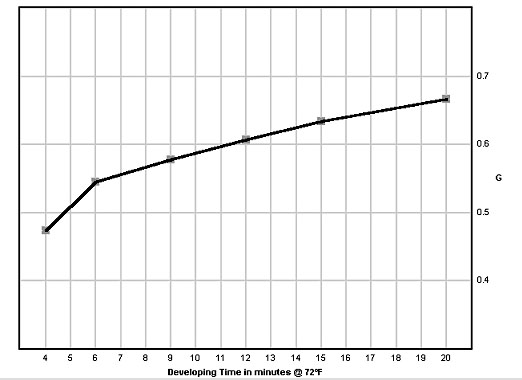
Figure 18. Kodak TRI-X, in Pyrocat-HD, 1:1:100. BLUE
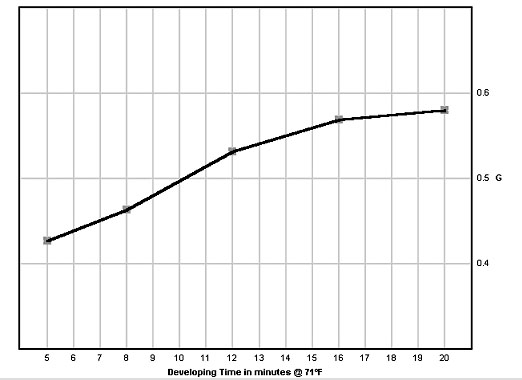
Figure 19. TMAX 400, in Pyrocat-HD, 1:1:100. BLUE
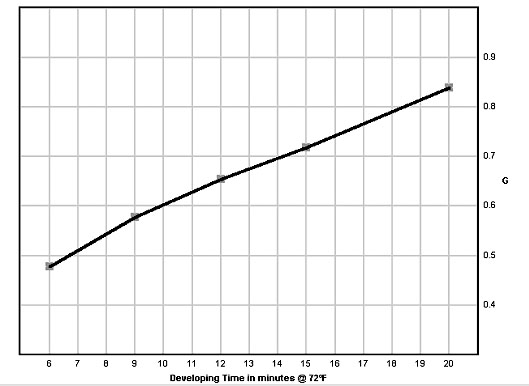
Figure 20. HP5+, in Pyrocat-HD, 2:2:100. BLUE
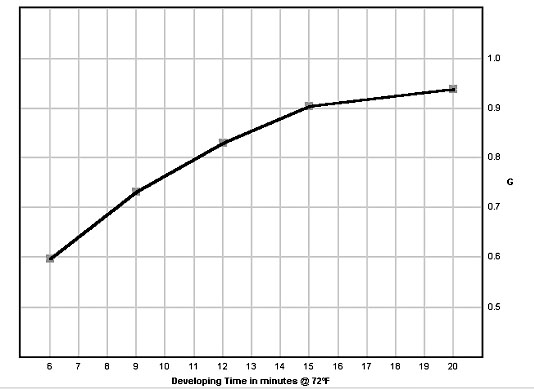
Figure 21. FP4+ Pyrocat-HD, 2:2:100. BLUE
Figure 22. Acros in Pyrocat-HD, 2:2:100. BLUE
Figure 23. TMAX 100, Pyrocat-HD, 2:2:100. BLUE
Figure 24. TMAX 400, Pyrocat-HD, 2:2:100. BLUE
Figure 25. PhotoWarehouse ASA 125, Pyrocat-HD, 2:2:100. BLUE
NOTES
1. E. J. Wall and Franklin I. Jordan, Photographic Facts and Formulas, Revised and extensively rewritten by John S. Carroll (1924; Englewood Cliffs: Prentice-Hall, Inc., 1976): p. 112.
2. Stephen G. Anchell, The Darkroom Cookbook (Boston: Focal Press, 1994): p. 175.
3. Steve Simmons, “Review of the Book of Pyro,” View Camera (September/October 1991): p. 23.
4. Information based on personal correspondence with Carl Weese.
5. Bob Herbst, “The Effects of Pyro Stain in Platinum Printing,” View Camera (July/August 1999): pp. 16-24. Republished online at http://unblinkingeye.com/Articles/Pyro/pyro.html.
6. Phil Davis, quoted in “The Black and White Corner,” View Camera (January/February 1998): p. 55.
7. Gordon Hutchings, quoted in “The Black and White Corner,” View Camera (January/February 1998): p 55.
8. Stephen G. Anchell and Bill Troop, The Film Developing Cookbook, pp. 79-80.
9. Ibid., p. 80.